


Miscellaneous
Automatic Swing Door Opener + Wi-fi, Alexa, Exterior Security Keypad, Interior Wireless Button
StK1836.p-1
$1,495.00 USD
-
Designed by the Disabled
for the Disabled -
100% Satisfaction
Guarantee -
Lowest Cost Shipping
Quoted in Cart
Does not have an electronic clutch. This means you must plan to use the door opener each time you pass through the door. Manufacturer calls this "Push-to-Go". See video below. There is a mechanical clutch that you can manually override the motor by pushing on the door in an emergency, but do not plan to operate the door manually in everyday use. If it detects an obstruction in the door it will auto reverse.
This is the differentiator between Open Sesame door openers we distribute and most others. The Electronic Clutch allows nondisabled family members and caregivers to open and close the door manually just as the wood without a door opener.
Incredible value, including all activation accessories!
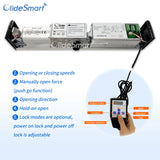
Safety Features
- Wireless Remote Function
- Over-Load Protect
- Auto-Reverse
- Over-Current E-Lock Function
- Selectable Delay Time (Close) 0s/5s/10s/15s
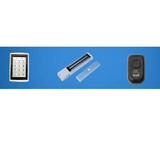
Many Available Accessories
- Exterior Security Keypad
- Touch Sensor - activates door when very lightly touch
- Infrared Touch Sensor - activates door when waving hand very close (we could not get this to work in testing)
- Radar Sensor - automatically opens door when someone approaches within 3ft-10ft, adjustable like you might experience in a retail store. Not recommended for use inside a home. Could be great for a pet.
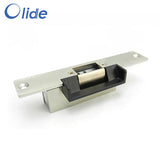
- Electric Strike -
- Electromagnetic Lock - An alternative to an electric strike or four doors that do not have or it's difficult to install an electric strike for the latch.
- Many more - contact us for your application
Specifications
| Model | DSW-100 |
| Recommended Uses | Assisting individuals with disabilities in opening doors |
| Voltage | 100-240V AC or 24v DC |
| Max. Door Weight | 265 lbs (120 kg) |
| Max Door Width | 1.2M |
| Opening Angle | 0-115° |
| Material | Stainless Steel |
| Color | Silver |
| Exterior Finish | Stainless Steel |
| Installation Type | Self-Adhesive (referring to push buttons, main unit is mounted) |
| Item Weight | 14.3 lbs / 6.5 kg |
| Item Size (LxWxH) | 20.5 x 3.2 x 3.7 in / 52 x 8.2 x 9.5 cm |
| Package Dimensions | 27 x 9.8 x 8.3 inches |
| Specification Met | CE Listed |
| UPC | 840349913728 |
| Country of Origin | China |
--------------Manual - some details may not match exactly---------------
Automatic Swing Door Opener Installation Manual
1. Introduction
Thank you for choosing the Automatic Swing Door Opener. This device is designed to provide convenient and accessible door operation for various environments, including homes, offices, hospitals, and schools. It features multiple control options, including wireless remotes, a keypad, exit buttons, and ID cards, making it suitable for assisting individuals with disabilities. Please read this manual thoroughly before installation and operation to ensure safe and efficient use.
2. Safety Instructions
WARNING: Failure to follow these safety instructions may result in injury or damage to the product.
- Always disconnect power before performing any installation, maintenance, or troubleshooting.
- Installation should be performed by qualified personnel in accordance with local electrical codes and regulations.
- Ensure all wiring connections are secure and properly insulated.
- Keep hands, clothing, and other objects clear of moving parts during operation.
- Do not allow children or unauthorized persons to operate the door opener without supervision.
- Regularly inspect the door opener for any signs of wear, damage, or loose components.
- This product is designed for swing doors weighing up to 220 lbs (100 kg). Do not exceed this weight limit.
3. Package Contents
- 1 x Automatic Door Opener Main Unit
- 1 x Swing Arm Assembly (convertible for pull/push)
- 1 x Mounting Base Bracket
- 2 x Wireless Remote Controls
- 1 x Access Control Keypad
- 2 x Door Exit Buttons
- 5 x RFID Cards
- Handicap Stainless Steel Push Button
- 1 x Power Cable
- Installation Hardware (screws, anchors, small tools)
4. Setup and Installation
The Automatic Door Opener is designed for straightforward installation. Follow these steps carefully

Figure 4.1: Overview of the installation process.
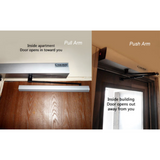
4.1 Choosing Door Opening Direction

Figure 4.2: Flexible opening options for outswing and inswing doors.
The door opener supports both outswing (pull open) and inswing (push open) configurations. Determine the appropriate setup for your door before proceeding.
4.2 Installation Steps
-
Install the Base Bracket: Securely mount the base bracket to the door frame or wall above the door opening using appropriate fasteners. Ensure it is level and aligned with the door's swing path.
-
Install the Main Engine: Carefully attach the main door opener unit (engine) onto the installed base bracket. Ensure it clicks into place or is securely fastened according to the specific mechanism.
-
Install Push or Pull Arm: Depending on your chosen door swing direction (inswing or outswing), attach the appropriate arm configuration to the main unit and the door. Adjust the arm length and angle for smooth operation and full door travel (up to 120 degrees for inswing).
Connect the power cable to the main unit and then to a 100-240V AC power source. Connect all control devices (keypad, exit buttons, sensors) to the main unit's designated terminals as per the detailed wiring diagram in the full product manual (not included here). Ensure all connections are correct before applying power.
5. Operating Instructions
Automatic Door Opener offers multiple ways to control door access:

Figure 5.1: Automatic door opener providing accessibility with push buttons.
5.1 Automatic/Manual Control

Figure 5.2: Various methods for automatic and manual door control.
- Microwave Sensor: The digital 2.4G microwave sensor provides quick opening (3-7 seconds) when motion is detected.
- Exit Button: Press the 'DOOR EXIT' button to open the door from the inside.
- Keypad: Enter your programmed access code on the keypad to open the door.
- ID Card: Swipe or tap a registered ID card against the reader to gain access.
- Stainless Steel Push Buttons: These large, accessible buttons are designed for easy activation, particularly useful for individuals with disabilities.
- Manual Mode: The door can be opened manually in case of power outage, providing convenience and safety.
5.2 Wireless Remote Control

Figure 5.3: Wireless remote control and its functions.
The wireless remote allows you to switch between opening modes as needed
- Button A: Lock the Sensor Signal (Only Manual Mode) - Disables automatic sensor activation, requiring manual input.
- Button B: Hold-Open - Keeps the door in the open position until deactivated.
- Button C: Reset - Resets the door opener to its default operating mode.
- Button D: Both Automatic and Manual Control - Toggles between automatic sensor mode and manual control options.
6. Maintenance
Regular maintenance ensures the longevity and optimal performance of your VEVOR Automatic Door Opener.
- Cleaning: Periodically wipe down the exterior of the main unit and sensors with a soft, damp cloth. Avoid abrasive cleaners or solvents.
- Inspection: Annually inspect all mounting hardware, wiring connections, and moving parts for signs of wear, corrosion, or looseness. Tighten any loose screws.
- Lubrication: The internal mechanisms are generally maintenance-free. If any squeaking or stiffness occurs in the arm assembly, apply a small amount of silicone-based lubricant to the pivot points.
- Sensor Check: Ensure the microwave sensor lens is clean and unobstructed for proper detection.
7. Troubleshooting
If you encounter issues with your door opener, refer to the following common problems and solutions:
| Problem | Possible Cause | Solution |
|---|---|---|
| Door does not open/close. | No power; loose wiring; sensor obstruction; remote battery low; motor fault. | Check power supply; inspect all wiring; clear sensor path; replace remote batteries; contact support if motor fault suspected. |
| Door opens partially or slowly. | Obstruction in door path; arm assembly binding; incorrect force setting. | Remove obstructions; check arm for smooth movement; adjust force settings (refer to full manual). |
| Remote control not working. | Low battery; out of range; remote not paired. | Replace remote batteries; move closer to the unit; re-pair remote (refer to full manual). |
| Excessive noise during operation. | Lack of lubrication; loose components; worn parts. | Lubricate pivot points on arm; tighten mounting screws; contact support for worn parts. |
For more detailed troubleshooting or issues not listed here, please refer to the comprehensive product manual or contact VEVOR customer support.
8. Specifications

Figure 8.1: Product dimensions and specifications.


Description
Does not have an electronic clutch. This means you must plan to use the door opener each time you pass through the door. Manufacturer calls this "Push-to-Go". See video below. There is a mechanical clutch that you can manually override the motor by pushing on the door in an emergency, but do not plan to operate the door manually in everyday use. If it detects an obstruction in the door it will auto reverse.
This is the differentiator between Open Sesame door openers we distribute and most others. The Electronic Clutch allows nondisabled family members and caregivers to open and close the door manually just as the wood without a door opener.
Incredible value, including all activation accessories!
Safety Features
- Wireless Remote Function
- Over-Load Protect
- Auto-Reverse
- Over-Current E-Lock Function
- Selectable Delay Time (Close) 0s/5s/10s/15s
Many Available Accessories
- Exterior Security Keypad
- Touch Sensor - activates door when very lightly touch
- Infrared Touch Sensor - activates door when waving hand very close (we could not get this to work in testing)
- Radar Sensor - automatically opens door when someone approaches within 3ft-10ft, adjustable like you might experience in a retail store. Not recommended for use inside a home. Could be great for a pet.
- Electric Strike -
- Electromagnetic Lock - An alternative to an electric strike or four doors that do not have or it's difficult to install an electric strike for the latch.
- Many more - contact us for your application
Specifications
| Model | DSW-100 |
| Recommended Uses | Assisting individuals with disabilities in opening doors |
| Voltage | 100-240V AC or 24v DC |
| Max. Door Weight | 265 lbs (120 kg) |
| Max Door Width | 1.2M |
| Opening Angle | 0-115° |
| Material | Stainless Steel |
| Color | Silver |
| Exterior Finish | Stainless Steel |
| Installation Type | Self-Adhesive (referring to push buttons, main unit is mounted) |
| Item Weight | 14.3 lbs / 6.5 kg |
| Item Size (LxWxH) | 20.5 x 3.2 x 3.7 in / 52 x 8.2 x 9.5 cm |
| Package Dimensions | 27 x 9.8 x 8.3 inches |
| Specification Met | CE Listed |
| UPC | 840349913728 |
| Country of Origin | China |
--------------Manual - some details may not match exactly---------------
Automatic Swing Door Opener Installation Manual
1. Introduction
Thank you for choosing the Automatic Swing Door Opener. This device is designed to provide convenient and accessible door operation for various environments, including homes, offices, hospitals, and schools. It features multiple control options, including wireless remotes, a keypad, exit buttons, and ID cards, making it suitable for assisting individuals with disabilities. Please read this manual thoroughly before installation and operation to ensure safe and efficient use.
2. Safety Instructions
WARNING: Failure to follow these safety instructions may result in injury or damage to the product.
- Always disconnect power before performing any installation, maintenance, or troubleshooting.
- Installation should be performed by qualified personnel in accordance with local electrical codes and regulations.
- Ensure all wiring connections are secure and properly insulated.
- Keep hands, clothing, and other objects clear of moving parts during operation.
- Do not allow children or unauthorized persons to operate the door opener without supervision.
- Regularly inspect the door opener for any signs of wear, damage, or loose components.
- This product is designed for swing doors weighing up to 220 lbs (100 kg). Do not exceed this weight limit.
3. Package Contents
- 1 x Automatic Door Opener Main Unit
- 1 x Swing Arm Assembly (convertible for pull/push)
- 1 x Mounting Base Bracket
- 2 x Wireless Remote Controls
- 1 x Access Control Keypad
- 2 x Door Exit Buttons
- 5 x RFID Cards
- Handicap Stainless Steel Push Button
- 1 x Power Cable
- Installation Hardware (screws, anchors, small tools)
4. Setup and Installation
The Automatic Door Opener is designed for straightforward installation. Follow these steps carefully
Figure 4.1: Overview of the installation process.
4.1 Choosing Door Opening Direction
Figure 4.2: Flexible opening options for outswing and inswing doors.
The door opener supports both outswing (pull open) and inswing (push open) configurations. Determine the appropriate setup for your door before proceeding.
4.2 Installation Steps
-
Install the Base Bracket: Securely mount the base bracket to the door frame or wall above the door opening using appropriate fasteners. Ensure it is level and aligned with the door's swing path.
-
Install the Main Engine: Carefully attach the main door opener unit (engine) onto the installed base bracket. Ensure it clicks into place or is securely fastened according to the specific mechanism.
-
Install Push or Pull Arm: Depending on your chosen door swing direction (inswing or outswing), attach the appropriate arm configuration to the main unit and the door. Adjust the arm length and angle for smooth operation and full door travel (up to 120 degrees for inswing).
Connect the power cable to the main unit and then to a 100-240V AC power source. Connect all control devices (keypad, exit buttons, sensors) to the main unit's designated terminals as per the detailed wiring diagram in the full product manual (not included here). Ensure all connections are correct before applying power.
5. Operating Instructions
Automatic Door Opener offers multiple ways to control door access:
Figure 5.1: Automatic door opener providing accessibility with push buttons.
5.1 Automatic/Manual Control
Figure 5.2: Various methods for automatic and manual door control.
- Microwave Sensor: The digital 2.4G microwave sensor provides quick opening (3-7 seconds) when motion is detected.
- Exit Button: Press the 'DOOR EXIT' button to open the door from the inside.
- Keypad: Enter your programmed access code on the keypad to open the door.
- ID Card: Swipe or tap a registered ID card against the reader to gain access.
- Stainless Steel Push Buttons: These large, accessible buttons are designed for easy activation, particularly useful for individuals with disabilities.
- Manual Mode: The door can be opened manually in case of power outage, providing convenience and safety.
5.2 Wireless Remote Control
Figure 5.3: Wireless remote control and its functions.
The wireless remote allows you to switch between opening modes as needed
- Button A: Lock the Sensor Signal (Only Manual Mode) - Disables automatic sensor activation, requiring manual input.
- Button B: Hold-Open - Keeps the door in the open position until deactivated.
- Button C: Reset - Resets the door opener to its default operating mode.
- Button D: Both Automatic and Manual Control - Toggles between automatic sensor mode and manual control options.
6. Maintenance
Regular maintenance ensures the longevity and optimal performance of your VEVOR Automatic Door Opener.
- Cleaning: Periodically wipe down the exterior of the main unit and sensors with a soft, damp cloth. Avoid abrasive cleaners or solvents.
- Inspection: Annually inspect all mounting hardware, wiring connections, and moving parts for signs of wear, corrosion, or looseness. Tighten any loose screws.
- Lubrication: The internal mechanisms are generally maintenance-free. If any squeaking or stiffness occurs in the arm assembly, apply a small amount of silicone-based lubricant to the pivot points.
- Sensor Check: Ensure the microwave sensor lens is clean and unobstructed for proper detection.
7. Troubleshooting
If you encounter issues with your door opener, refer to the following common problems and solutions:
| Problem | Possible Cause | Solution |
|---|---|---|
| Door does not open/close. | No power; loose wiring; sensor obstruction; remote battery low; motor fault. | Check power supply; inspect all wiring; clear sensor path; replace remote batteries; contact support if motor fault suspected. |
| Door opens partially or slowly. | Obstruction in door path; arm assembly binding; incorrect force setting. | Remove obstructions; check arm for smooth movement; adjust force settings (refer to full manual). |
| Remote control not working. | Low battery; out of range; remote not paired. | Replace remote batteries; move closer to the unit; re-pair remote (refer to full manual). |
| Excessive noise during operation. | Lack of lubrication; loose components; worn parts. | Lubricate pivot points on arm; tighten mounting screws; contact support for worn parts. |
For more detailed troubleshooting or issues not listed here, please refer to the comprehensive product manual or contact VEVOR customer support.
8. Specifications
Figure 8.1: Product dimensions and specifications.
F.A.Q
We will send tracking information to the e-mail address associated with your order once the item has shipped. If you have not received your tracking information and it has been over 2 business day, please contact us at (012) 123 - 4567
Related Products
Recently Viewed
Recently Wishlisted
Add on optional description to this section
Let customers speak for us

I’ll write something later, I’m still learning to work it efficiently.

Excellent
Excellent

This is at least the second of this model. My daughter has a power chair and uses it to get more time to use her iPad.

Excellent
Excellent


My son was paralyzed in an atv accident Aug 2020. He is 6'3" and 250. His injury is c6-c7. He feels so free and relaxed in the water but nobody had anything but regular life jackets so we would have to add a pool noodle to support his head and neck and a square flat float to hug in front. We also had a problem because he isn't a small man. Nothing that would allow his arms free so he could get some exercise. This life jacket has helped a lot. There are a few tweaks with the neck and crotch straps. If they weren't tight enough in the crotch area then his head could slip lower even though we had the neck piece as secured as we could. But the crotch straps when tightened too much they would be a little irritating and cause Autonomic Dysreflexia. I think I will try adding a pad of some sort around the straps. That was the only issue other than the cost, but we would pay anything to see that smile on his face! Now we just need to buy a pool for our own backyard so we don't have to go on vacation to swim. Thank You! I would highly recommend this life jacket. From a very happy mom that cried with happiness to see her son in a pool and able to move around.
I use it today for the first time. My son love it!

My husband who had been diagnosed with Bulbar ALS disease for 2 years at the age of 63 had all his symptoms reversed with Ayurveda medicine from naturalherbscentre. com after undergoing their ALS/MND natural protocol, he no longer requires a feeding tube. God Bless all Lou Gehrig’s disease Caregivers. Stay Strong, take small moments throughout the day to thank yourself, to love your self, and pray to whatever faith, star, spiritual force you believe in and ask for strength. I can personally vouch for these remedy but you would probably need to decide what works best for you.

I used a comfort carrier @ Disney and lost the case

RoboHandle Ergonomic Tool Handle